TidalCore
Info
IMPORTANT: Make sure you followed the prerequisite guide for TidalCore with the OS set up. You should also have some familiarity with Linux at this point. You should also have Git configured.
Step 1: ROS Install
Info
Make sure that if you are using Linux, that you are entering the container by running toolbox enter ros, so the installation happens inside of the container, and this must be done for every new terminal session.
This first step will involve installing ROS2 Kilted Kaiju. You should follow the steps outlined on their documentation, which can be found here. More specifically, you need to follow the follow steps on their page. Keep in the following details:
- Install ROS2 development tools
- Do a full ROS desktop install
- Add the command
source /opt/ros/kilted/setup.bashat the bottom of your.bashrcfile, which can be found in your home directory
Tip
The ROS desktop install is not actually needed, the bare-bones install works (and is what is used on the Controls PC), but it comes with tutorials and some GUI features which you can use while following the tutorials.
Once you have completed the ROS install, follow the examples at the bottom of the page, and ensure that you can see the messages.
Step 1.5: ROS Tutorials
At this point, you should take the time to actually learn how to develop against ROS, and get familiar before continuing with the rest of the steps. ROS has some excellent tutorials here, and taking some care to understand these concepts and work through the tutorials should give you some good experience.
It is recommended to follow the following tutorials:
- First Steps with ROS - learning path
- Beginner: CLI Tools (take this opportunity to get familiar with Linux!)
- Beginner: Client Libraries (you actually write code)
- Intermediate (You don't need to do everything, only whats listed below)
- Launch
- Creating a Launch File
- Monitoring for Parameter Changes
- Launch
These tutorials give a baseline overview of many of the core concepts of ROS which we use on a day-to-day basis. Once you feel comfortable with using ROS, you can move onto installing and configuring TidalCore.
Step 2: TidalCore Code Setup
We will first install the dependinces used by TidalCore, which is a combination of python and C++ packages. To install them, run the following:
sudo pip install --break-system-packages websockets canopen pyserial pynmea
sudo apt install nlohmann-json3-dev
Warning
Do not use apt to install python packages, as they are usually very out of date.
You will now clone the git repo for TidalCore. Many of the scripts and tutorials expect the TidalCore code repo to be located at ~/eboat_src/, so this is where we will clone the Git repo.
Tip
While optional if you have already setup Git yourself, you should authenticate with GitHub at this point, so you can make commits from your account. Run $ sudo apt install gh -y to install the GitHub CLI, then run $ gh auth login, and make sure to authenticate with Git, and store the credentials with Git.
Whilst in the home directory, you can now run:
If you have completed the ROS2 tutorials, you will know that you need to source the environment. In our code, the ROS2 workspace is located at ~/eboat_src/ros_ws.
At this point, you should now try to compile and build the actual code:
The--symlink-install flag exists to provide better compatibility with IDE's, since the build files will now point to the original python source code instead of being a copy. This makes it so that we don't have to keep rebuilding to get updated sources for our IDE. This only applies to Python code, since C++ code gets compiled into a binary, which must be redone every time the source code changes.
Tip
(OPTIONAL) We will now add a convenience command for development, which will enter our ROS workspace, and run $ source install/setup.bash from one single command,
- In your
~/.bashrcfile, insert at the bottomalias eboat="cd ~/eboat_src/ros_ws/ && source install/setup.bash" - Run
$ source ~/.bashrc
You can now open a new terminal window (whether this be a Windows terminal tab and clicking on Ubuntu, running toolbox enter..., etc), you can run eboat, and be ready to use any ROS2 command (ros2 launch/run/topic/...), with all your environment variables set for TidalCore set, instead of having to type out 2 long-ish commands.
Step 3: Running Code in Test Mode
At this point, you can now try to run the code and see if it successfully connects to TidalShore.
To get started, open TidalShore in a web browser, and open up a new terminal tab, then:
On the first run, this command should give an error that it couldn't find install/setup.bash, since we have not built anything yet. To actually compile the code, run:
Once the build is complete and is successful, rerun:
You will now have sourced the TidalCore ROS environment.
Lastly, run the test launch file by running:
You should then get a terminal output similar to below:
❯ ros2 launch launch/test_eboat_allnodes_python.yaml
[INFO] [launch]: All log files can be found below /home/----/.ros/log/2026-08-10-12-57-05-592153-toolbx-94234
[INFO] [launch]: Default logging verbosity is set to INFO
[INFO] [shore-1]: process started with pid [94237]
[INFO] [main-2]: process started with pid [94238]
[INFO] [test-3]: process started with pid [94239]
[INFO] [test-4]: process started with pid [94240]
[INFO] [test-5]: process started with pid [94241]
[INFO] [time_node-6]: process started with pid [94242]
[INFO] [sys_util-7]: process started with pid [94243]
[time_node-6] [INFO] [1786381025.996463644] [time]: The current time is ---- | ----
[main-2] [INFO] [1786381025.997540701] [alarms_watchdog]: Attempting to load /home/----/eboat_src/data/FAULTS.csv
[main-2] [INFO] [1786381025.999334848] [alarms_watchdog]: Loaded 441 error codes
[main-2] [INFO] [1786381025.999618522] [alarms_watchdog]: Attempting to load /home/----/eboat_src/data/fault_id_mapping.csv
[main-2] [INFO] [1786381026.000151635] [alarms_watchdog]: Loaded 192 motor error codes
[shore-1] [INFO] [1786381026.028064708] [shore_comms]: Logging </alarm/shore/publish> with custom msg of <ShoreBoatAlarm>
[shore-1] [INFO] [1786381026.029466365] [shore_comms]: Logging </alarm/shore/delatch> with custom msg of <ShoreBoatAlarm>
[shore-1] [INFO] [1786381026.282739757] [shore_comms]: Logging </rosout> with custom msg of <Log>
[shore-1] [INFO] [1786381026.283457267] [shore_comms]: Logging </motion/gps> with custom msg of <GPSData>
[shore-1] [INFO] [1786381026.283905020] [shore_comms]: Logging </motion/vtg> with custom msg of <GPSVTGData>
[shore-1] [INFO] [1786381026.284321514] [shore_comms]: Logging </motion/sv> with custom msg of <GPSSVData>
[shore-1] [INFO] [1786381026.284789815] [shore_comms]: Logging </motion/gsa> with custom msg of <GPGSAData>
[shore-1] [INFO] [1786381026.285262374] [shore_comms]: Logging </cell> with custom msg of <CellData>
[shore-1] [INFO] [1786381026.285697363] [shore_comms]: Logging </motors/motorA> with custom msg of <CANMotorData>
[shore-1] [INFO] [1786381026.286140026] [shore_comms]: Logging </motors/motorB> with custom msg of <CANMotorData>
[shore-1] [INFO] [1786381026.286519210] [shore_comms]: Logging </motors/can_bus_state> with custom msg of <CANBusStatus>
[shore-1] [INFO] [1786381026.286939882] [shore_comms]: Logging </bms/cell_voltage> with custom msg of <BMSCellVoltage>
[shore-1] [INFO] [1786381026.287366074] [shore_comms]: Logging </bms/pack_summary> with custom msg of <BMSPackSummary>
[shore-1] [INFO] [1786381026.287868008] [shore_comms]: Logging </bms/soc_summary> with custom msg of <BMSSOCSummary>
[shore-1] [INFO] [1786381026.288414898] [shore_comms]: Logging </bms/mcu_summary> with custom msg of <BMSMcuSummary>
[shore-1] [INFO] [1786381026.288872679] [shore_comms]: Logging </can/cooling_temp> with custom msg of <CANThermistor>
[shore-1] [INFO] [1786381026.289442311] [shore_comms]: Logging </can/bms_thermistor> with custom msg of <CANThermistor>
[shore-1] [INFO] [1786381026.289879624] [shore_comms]: Logging </boat_time> with custom msg of <Time>
[shore-1] [INFO] [1786381026.290344439] [shore_comms]: Logging </sys_utilization> with custom msg of <SysUtilData>
[shore-1] [INFO] [1786381026.293247683] [shore_comms]: Attempting to connect to the Shore Server via a Websocket at wss://---tidalshore url---/api
[shore-1] [INFO] [1786381026.396921928] [shore_comms]: Connected to the websocket at wss://---tidalshore url---/api ✅
[shore-1] [INFO] [1786381026.397490588] [shore_comms]: Data will be sent every 0.1s
You should also see TidalShore start to show the test data as well.
Warning
The build and deployment process for ROS2 is very particular, and there are a number of considerations that you need to be aware of to ensure that you are deploying the correct code.
- Running
$ colcon build [...]will result in thebuild,install,logsfiles being stored wherever you ran the command. This means that the$ source install/setup.bashwill end up depending on what folder you are in. And if you have multiple terminal windows open, in different directories, running thesourcecommand will result in you actually using completely different files than what you intended. To avoid this, make sure that you are always running$ colcon buildin a consistent place (such as ineboat_src/ros_ws) to prevent mix ups - Make sure that whenever you are switching branches, you run
$ rm -rf build install logsto wipe any old build files (including build files of old nodes), before rerunningcolcon build, and running$ source install/setup.bash(or$ eboatif you set up the command)
Step 4: IDE Setup
Unfortunately, setting up your IDE can be quite complicated depending on which environment you are running. Whilst this guide tries to give a configuration that does work, it can take some manual adjustment to get working.
There are 2 IDE's which we recommend you use, JetBrains IDE's (PyCharm & CLion), and VSCode with the clangd language server.
In order for any of the IDE's to work, we need to make sure that we start the IDE from a ROS sourced environment. This will allow the IDE to be able to see the ROS packages, libraries, etc. needed to actually develop. Therefore, all of these different configurations
Note
This is for if you are running Linux as your MAIN OS, not if you are running WSL on Windows. There are separate instructions for Ubuntu specifically.
In order for the Jetbrains IDE to be able to recognize the sourced environment, we will need to run the IDE executable whilst inside of the container.
To get started, we recommend using Jetbrains Toolbox along with the Jetbrains Student Developer Pack. Once installed and running, you need to go to Settings -> Tools -> Generate Shell Scripts, and enable that option.
You can now install PyCharm (Python IDE) or CLion (C++ IDE). Once they are done installing, start a new terminal instance, and ensure that you can start the IDE by running:
orIf the IDE has successfully started, close the IDE if you haven't already.
The next steps have to be performed every time you want to open the IDE. First, enter the toolbox/container by running:
Then, source the ROS workspace by doing either:
or, if you set it up following the optional instructions:
Finally, start the IDE by running either the clion or pycharm commands. At this point, the IDE should pick up all the system libraries, and you can open and modify the code.
In order for the Jetbrains IDE to be able to recognize the sourced environment, we will need to run the IDE executable whilst we have a sourced terminal environment.
To get started, we recommend using Jetbrains Toolbox along with the Jetbrains Student Developer Pack. Once installed and running, you need to go to Settings -> Tools -> Generate Shell Scripts, and enable that option.
You can now install PyCharm (Python IDE) or CLion (C++ IDE). Once they are done installing, start a new terminal instance, and ensure that you can start the IDE by running:
orIf the IDE has successfully started, close the IDE if you haven't already.
The next steps have to be performed every time you want to open the IDE. First, source the ROS workspace by doing either:
or, if you set it up following the optional instructions:
Finally, start the IDE by running either the clion or pycharm commands. At this point, the IDE should pick up all the system libraries, and you can open and modify the code.
Downloading the IDE
To get started, we recommend installing Jetbrains Toolbox, as it will make it easier to manage your IDE's.
Once you have installed Jetbrains Toolbox, download the Gateway IDE from Jetbrains Toolbox.
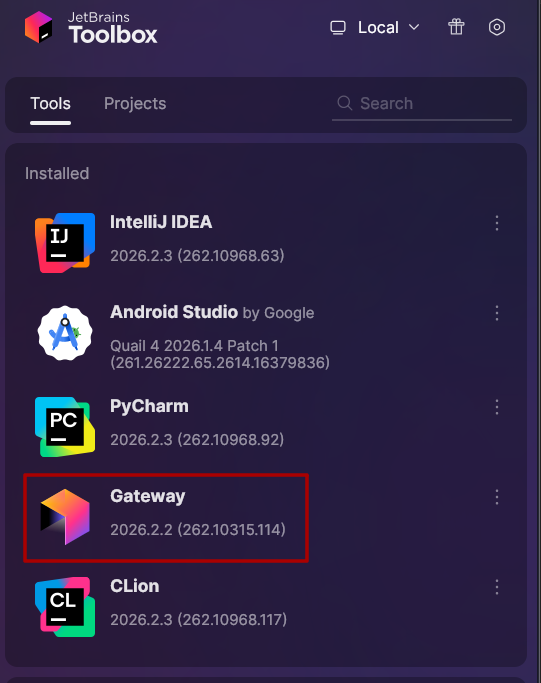
Once installed, open the Gateway application.
The way that this will work is that we will run the IDE backend inside of the ROS environment, with the frontend running on Windows. Therefore, we will now install the Python ide, Pycharm.
You will now click on New Project, select WSL, and pick the correct WSL container. Be careful to select the correct one.
Once on the IDE selection screen, you will select PyCharm as your IDE, and select your Linux home directory as the project folder. This will be changed later, but we just need to do this so it will download the IDE and set everything up.
Once you are ready, you can click on "Download IDE and Connect", and it will start downloading in the background.
Setting up the IDE Backend
In general, what we want to do is manually start the IDE backend by running the remote-dev-server executable file whillst we are "sourced". As a reminder, you will only be able to use ROS2 once you have ran source /opt/ros/kilted/setup.bash and source install/setup.bash inside of our ros_ws.
To accomplish this, we will create an alias to run remote-dev-server program inside of our terminal after we have ran our source ... commands.
To get started, we first need to find where the actual IDE backend is located. The files for the IDE backend are located in the folder /.cache/JetBrains/RemoteDev/dist/{IDE VERSION}/bin/. To find our specific {IDE VERSION}, go to the /.cache/JetBrains/RemoteDev/dist/ folder, and look for the name of your IDE. For example, in our testing, our folder was named ea819915c4e60_pycharm-2026.2.3. Write down the name of this folder, we will need it later.
We will now create an alias for this command, and append it to the bottom of our .bashrc file so it will always be avaliable. Add the following command to the bottom of the file ~/.bashrc without including the braces:
alias pycharm="~/.cache/JetBrains/RemoteDev/dist/{FOLDER NAME YOU WROTE DOWN}/bin/remote-dev-server run"
alias pycharm="~/.cache/JetBrains/RemoteDev/dist/ea819915c4e60_pycharm-2026.2.3/bin/remote-dev-server run"
Finally, run source ~/.bashrc to immediately apply your changes to the current terminal session.
Running the IDE
These steps must be ran everytime.
To run the IDE, first open a new terminal window and run:
Then, enter the ROS workspace for our code and source our workspace:cd (wherever the ROS workspace is located)
./clean_and_build_python.sh # if you havent built the code yet, do it first
source install/setup.bash
Then, start the IDE backend by running:
In Jetbrains Gateway, click on WSL and open the exisiting project:
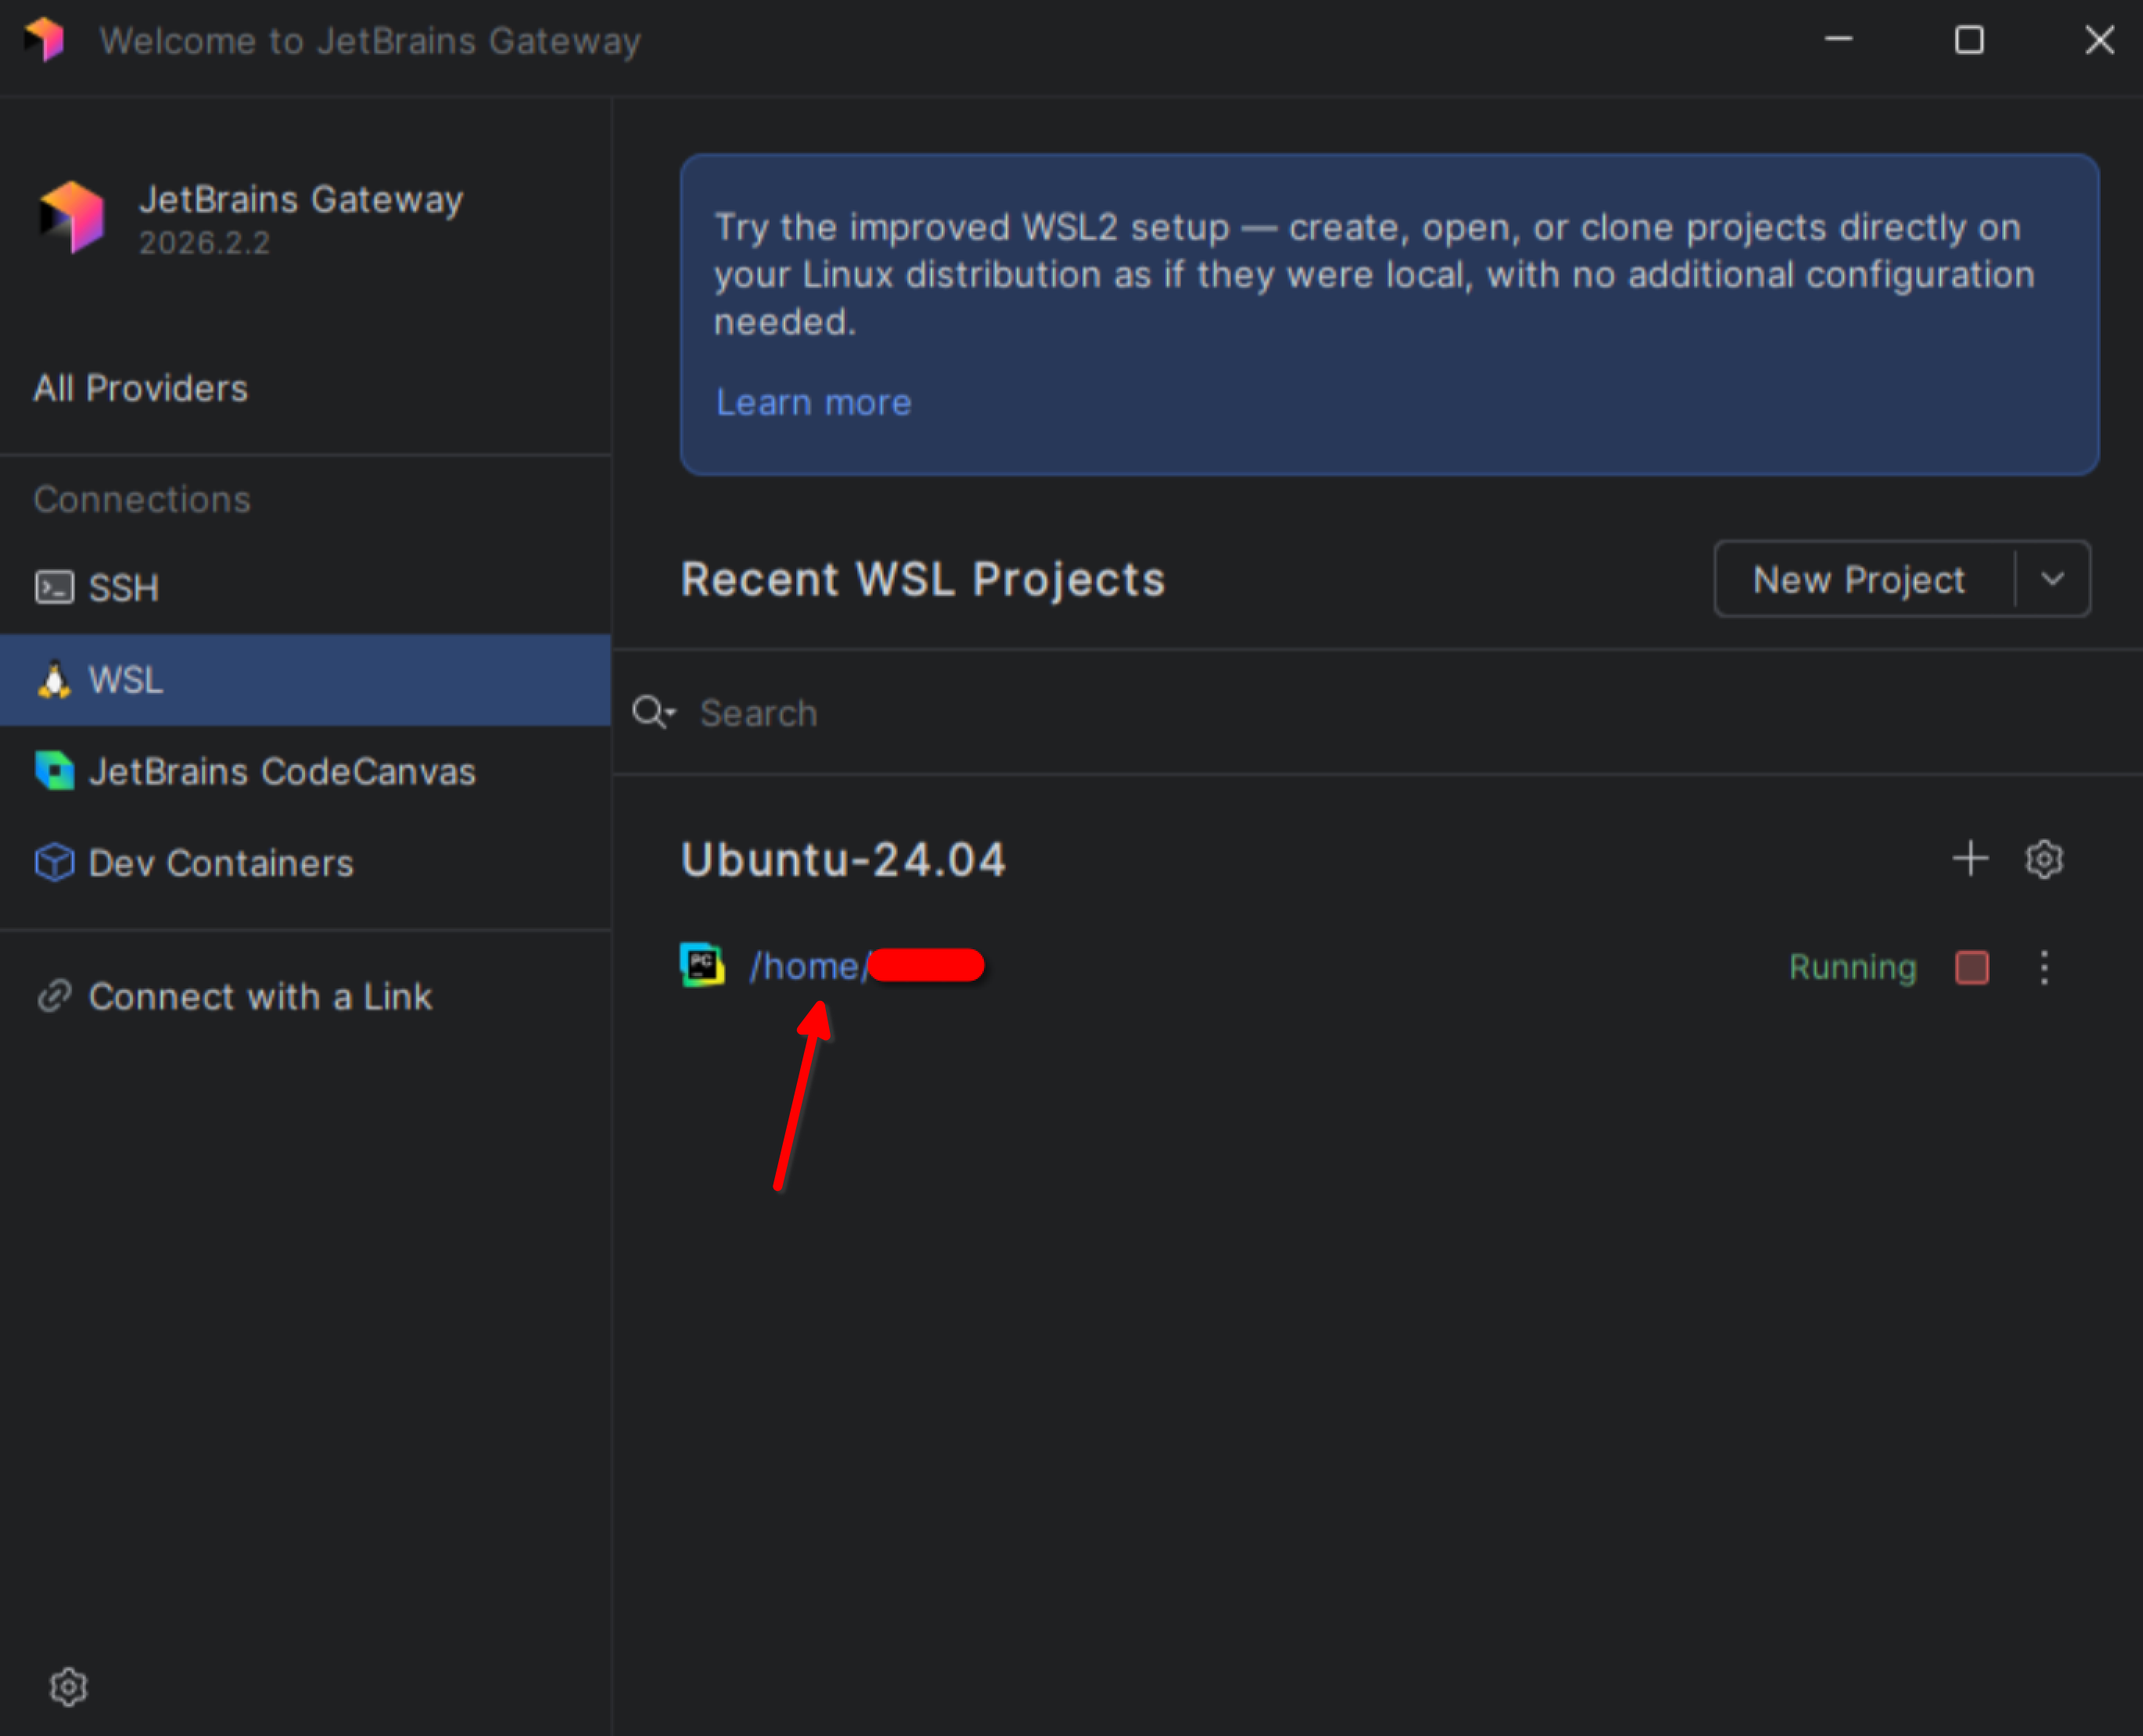
You may need to click on File -> Open and open our ROS workspace folder.
In some cases, you may need to manually specify the Python interperter that is used, to do this, follow the images below.
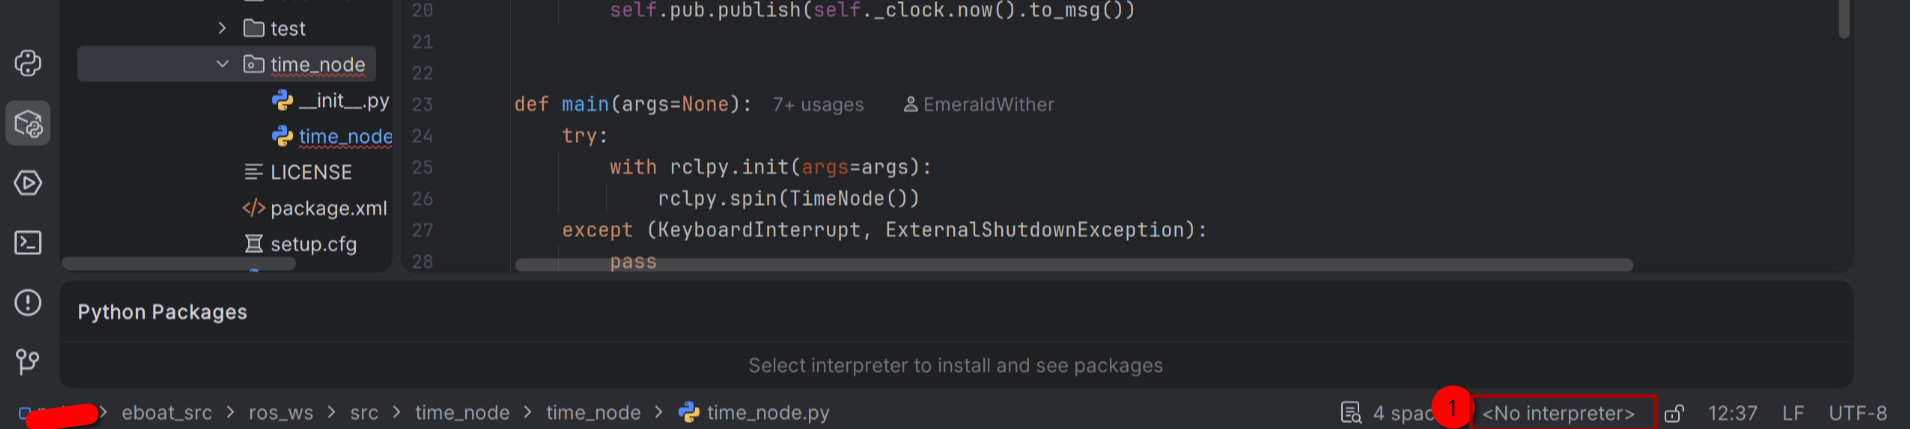
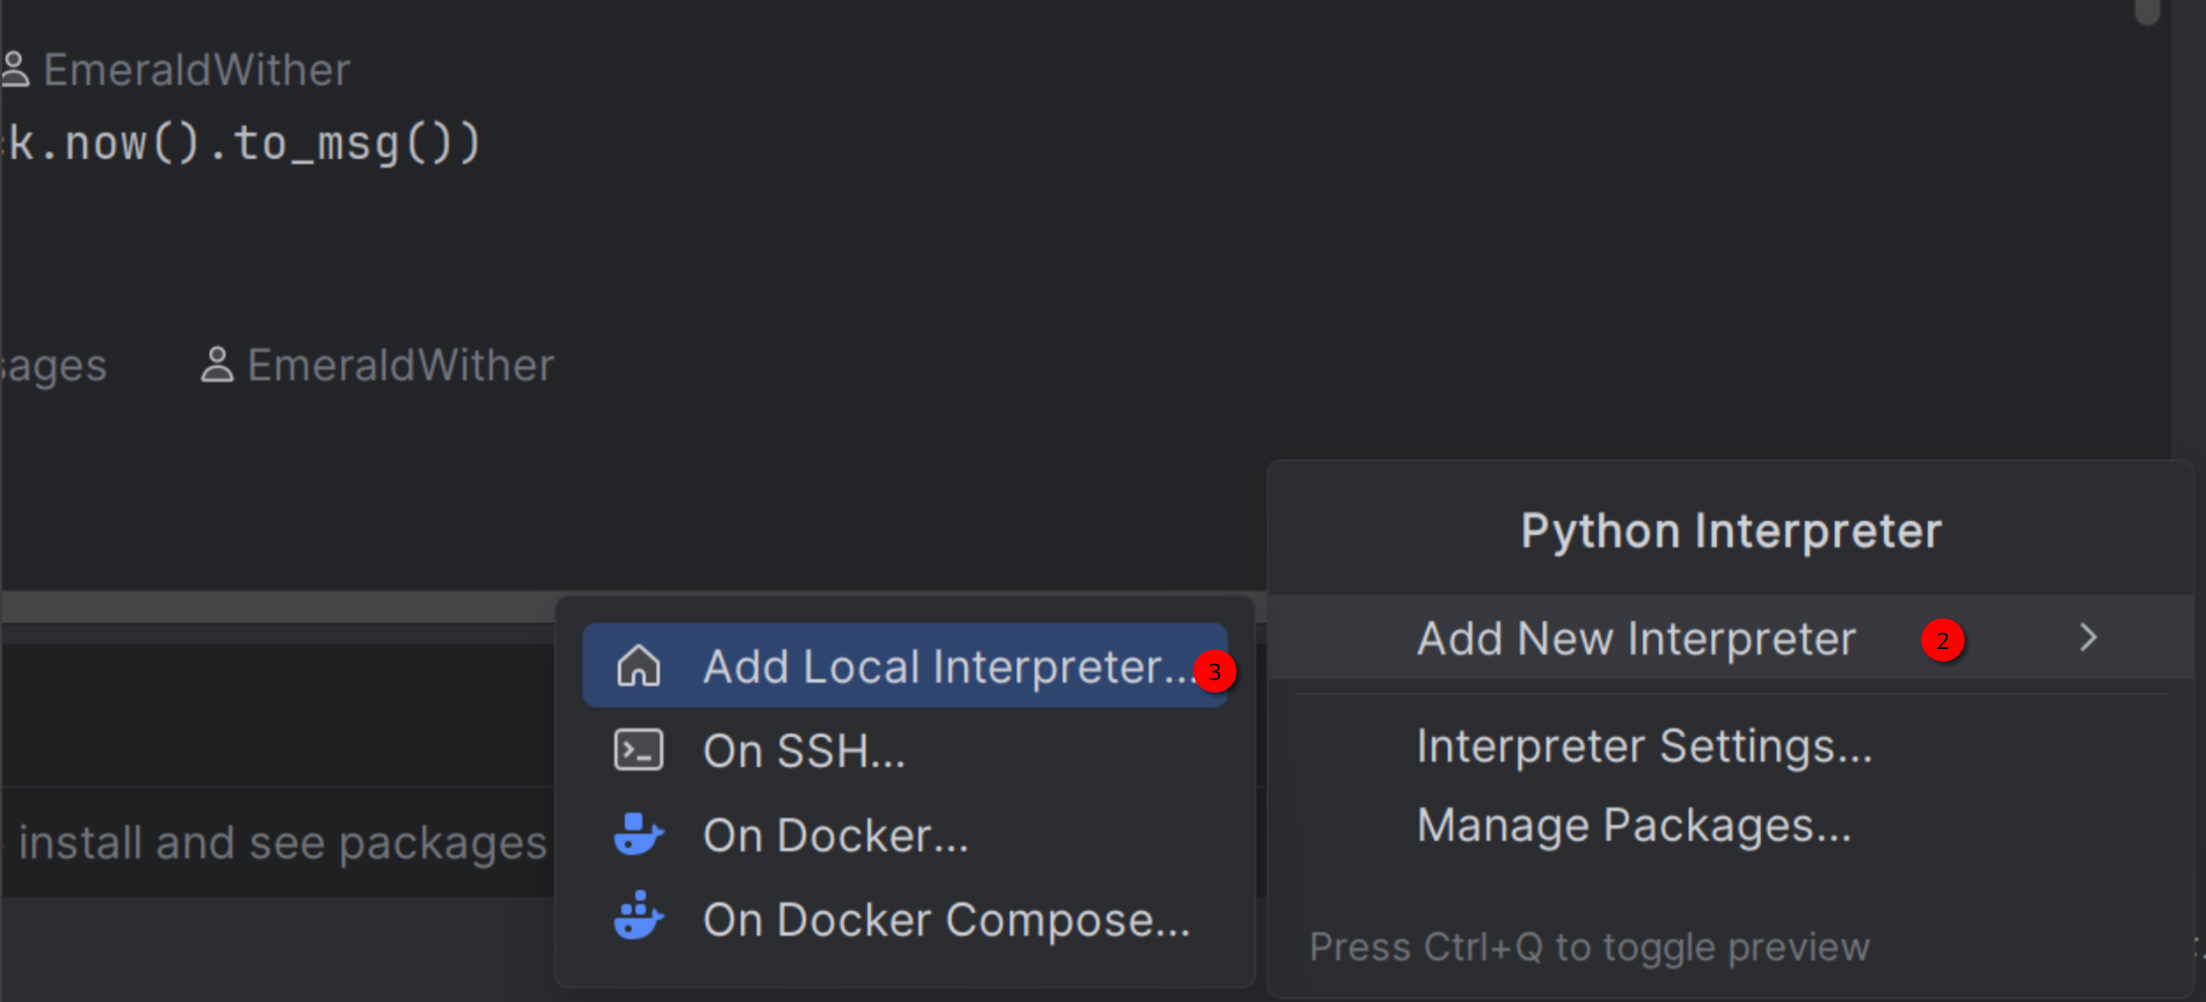
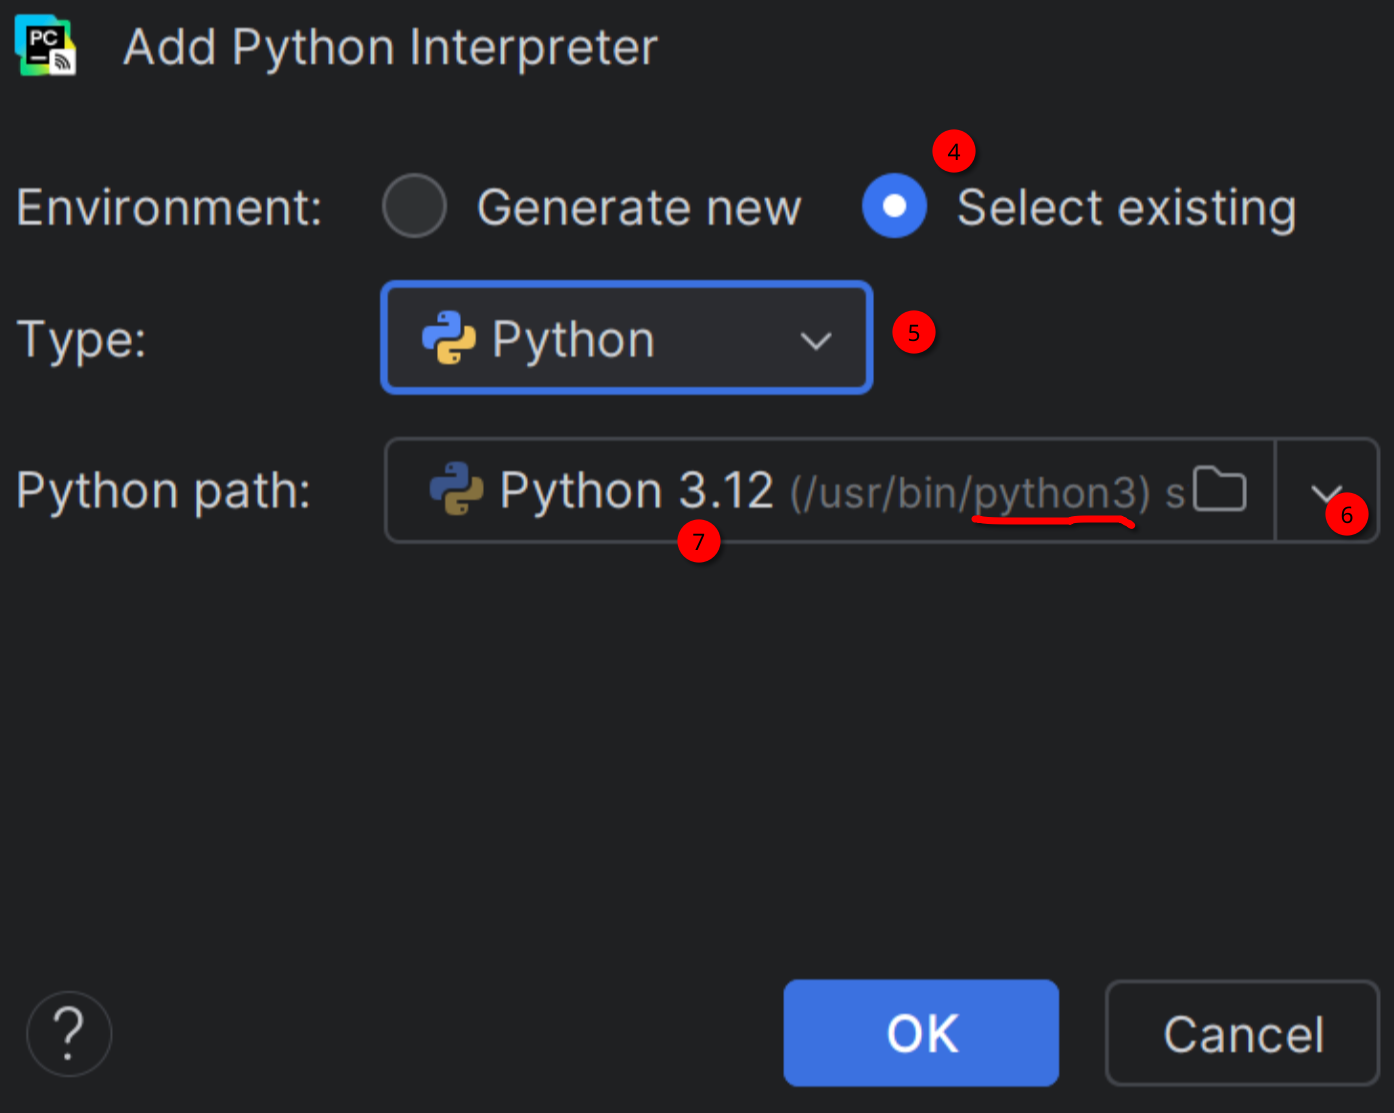
At this point, you should be able to modify code with proper intellisense.
Note
This is for if you are running Linux as your MAIN OS, not if you are running WSL on Windows. There are separate instructions for Ubuntu specifically.
You will first need to install VSCode. This can either be done by installing it using Flatpak, or your distributions package manager. Once installed, you should be able to run:
You should now install the following extensions for VSCode:
- C/C++ Extension Pack
- Python Extension Pack
- Pylance
- clangd
- It may prompt you to install the
clangdlanguage server.
- It may prompt you to install the
The next steps have to be performed every time you want to open the IDE. First, enter the toolbox/container by running:
Then, source the ROS workspace by doing either:
or, if you set it up following the optional instructions:
Finally, start the IDE by running the code command. At this point, the IDE should pick up all the system libraries, and you can open and modify the code.
You will first need to install VSCode. This can either be done by installing it using Flatpak, or your distributions package manager. Once installed, you should be able to run:
You should now install the following extensions for VSCode:
- C/C++ Extension Pack
- Python Extension Pack
- Pylance
- clangd
- It may prompt you to install the
clangdlanguage server.
- It may prompt you to install the
The next steps have to be performed every time you want to open the IDE. First, source the environment by running:
or, if you set it up following the optional instructions:
Finally, start the IDE by running the code command. At this point, the IDE should pick up all the system libraries, and you can open and modify the code.
TODO Keep in mind that VSCode is not the recommended IDE, we personally recommend using the Jetbrains IDE